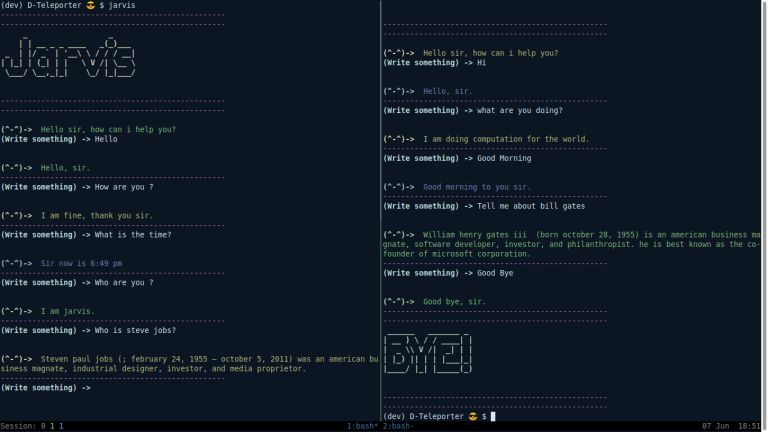
It is a terminal-based virtual assistant especially made for competitive programming. It has a lot of features, including running python or c++ file, parsing problem set with test cases and test against all the cases in one click, test with brute force solution, and many more. It will help you to boost your programming skill and help you to do a good performance in the programming contest.
It can give voice reply and take your voice command. You can turn off or on these features. Basic settings can be easily changed from config option.
For installing write the given commands,
pip3 install wheel
and
pip3 install ai-virtual-assistant
I recommand after installing checkout the config file. The config can be open by the given command,
jarvis -config
Programming Features
- [x] [Run c++ or python program]
- [x] [Competitive Companion Support]
- [x] [parse problemset]
- [x] [generate file with template]
- [x] [test code against testcases]
- [x] [add testcase]
- [x] [bruteforce test solution]
- [x] [Generate-testcase-genarator-automatically]
- [x] [login online judge]
- [x] [submit code]
- [x] [Parse contest]
Other Features
- [x] [Speaking Capability]
- [x] [taking voice command]
- [x] [Speech Recognition]
- [x] [Ai to answer quesion]
- [x] [goto any website]
- [x] [solving math]
- [x] [wiki search]
- [x] [google search]
- [x] [YouTube search & play videos]
- [x] [learn from answer]
- [x] [download files]
- [x] [access from anywhere]
Run python or cpp program
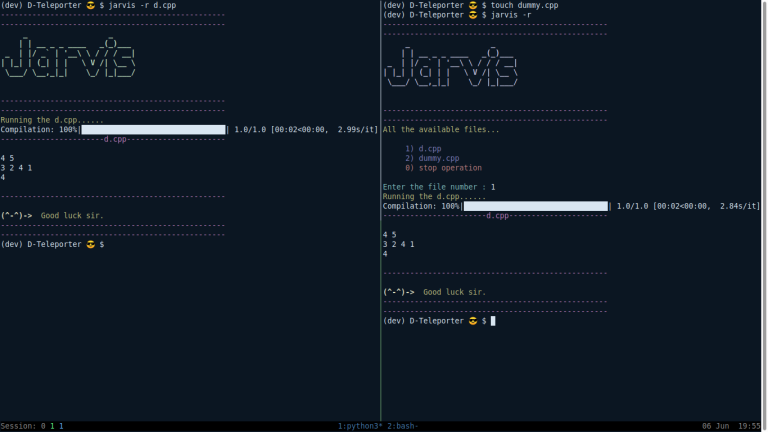
Any python or c++ files from the current directory can be run using one command. The command is given below,
jarvis -r "file_name"
or,
Cp -r "file_name"
If you don't specify the file_name, it will list all the available python and c++ files in the current directory and you have to choose.
You can run in debug mode. Debug mode is running C++ file with custom flags. The command for running in debug mode is given below,
Cp -r -d
If you want to run the program more than one time you can do that. I thing this is one of the useful command because it helps to check mulitple tests in just one command and one compilation , that saves time. The command for running more than one time is given below,
Cp -r -'number of times'
If you want to keep executable file after running, you can use '-c' command,
An example is given below,
Cp -r -c -3 'file_name'
with debug,
Cp -r -cd -3 'file_name'
it will run jarvis in debug mode and it will run 3 times. And after execution, it will keep the executable file.
Parsing Problem from online judge
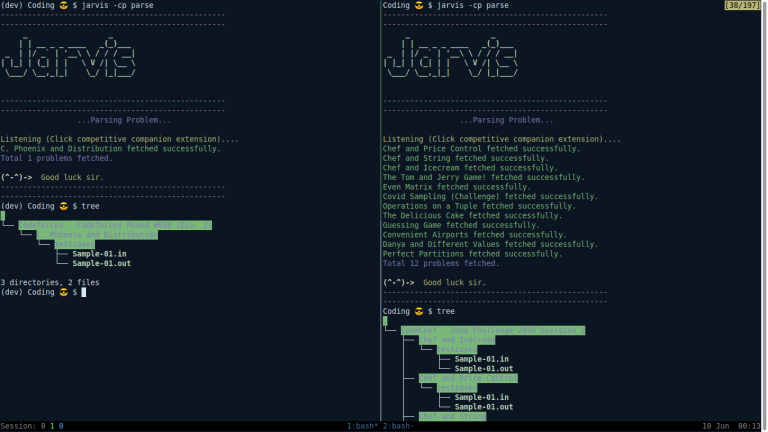
Competitive Companion support makes parsing problems really very easy. Just give the command,
jarvis -cp parse
or,
Cp parse
or,
jarvis -cp listen
or,
Cp listen
Here -cp represent competitive programming,
It will start listening, then you can just click the competitive companion browser extension. It will parse the problem.
After parsing there will create a new folder according to the contest name and in that folder will be another folder according to the problem name. And it will contain all the sample test cases of that problem.
Also, the problem can be parsed without competitive companion though I don't recommend this. the command is given below,
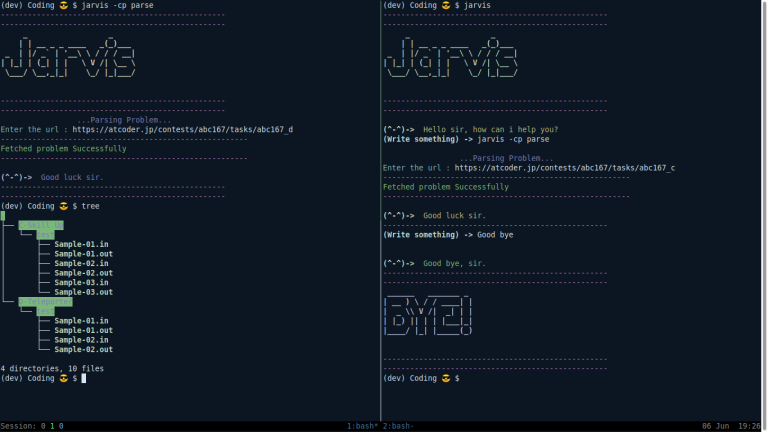
jarvis -cp problem
or
Cp problem
After giving the command it will ask for the problem URL. Just give the URL,it will parse the problem. There will be created a folder according to the problem name. And it will contain all the sample test cases of that problem.
Generate File with Template
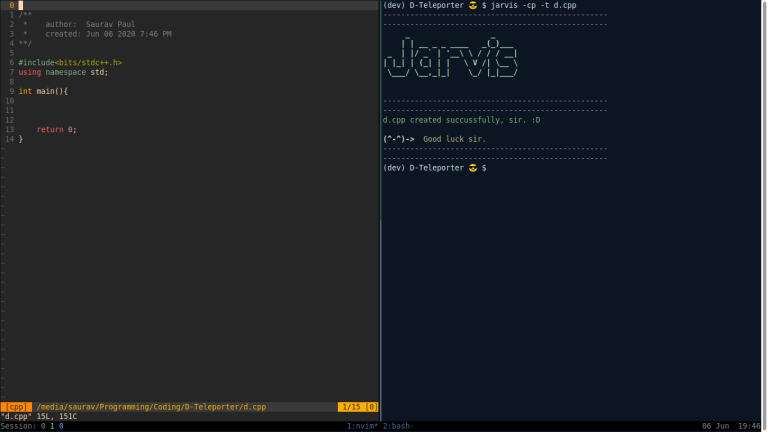
You can easily generate your file with the template by the given command,
jarvis -cp -t "file_name"
or
Cp -t "file_name"
If you don't specify the file_name it will be automatically created as "sol.cpp". You can create a python or c++ file.
You have to specify your template path. Just open config file and find template_path and give your path for c++ and python.
You can use variables in your template file which you will be replaced,
variable available,
- [$%CODER%$]
- [$%DATE_TIME%$]
- [$%PROBLEM_NAME%$]
- [$%PROBLEM_URL%$]
- [$%TIMELIMIT%$]
- [$%MEMORYLIMIT%$]
[$%CODER%$] will be replaced by your name. It can be specified in coder_name in config file. Otherwise just change boss name from config. Boss name will be automatically mirrored to the coder_name.
[$%DATE_TIME%$] will be replaced by your file creating time and date.
N.B: No need to add '[]' bracket with variables names, I added this for writing this blog because otherwise, I was facing some markup language error.
Example :
Template file,
/**
 *    author:  [$%CODER%$]
 *    created: [$%DATE_TIME%$]
**/

#include<bits/stdc++.h>
using namespace std;

int main(){


    return 0;
}
Genarated file,
/**
 *    author:  Saurav Paul
 *    created: Jun 06 2020 9:05 PM
**/

#include<bits/stdc++.h>
using namespace std;

int main(){


    return 0;
}
Test solution
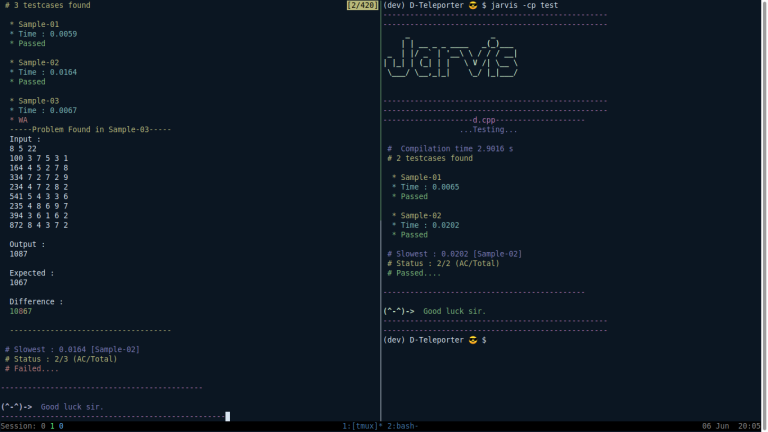
After parsing problem set, the solution can be tested by the given command,
jarvis -cp test
or
Cp test
It will run all the sample and custom cases from the test folder(Test folder contains all the sample cases after parsing problem set) and check whether your solution is passed. It will show the taken time for running each case. If your code failed any test cases it will show the differences between the correct answer and your output. If every case passed then it will show passed.
It is not necessary to have a parsed problem set for using this command. You can make a test folder and add input(.in) and output(.out) case into that folder and then run this command.
Add Testcase
Adding testcase is really very easy. Just give the command,
jarvis -cp add
or
Cp add
Yes, that simple :sunglasses: .
It will ask for input and output for your new case. Then it will add this case.
Test solution with bruteforce
If you have any doubts about your optimal solution, then you can write a brute-force solution and write a random test case generator. You can test your optimal solution with a brute force solution using a random test case.
For that, you need three files.
1. Main solution
2. Bruteforce solution
3. Testcase Generator (My AI can generate it automatically)
Then run this command,
jarvis -cp brute
or
Cp brute
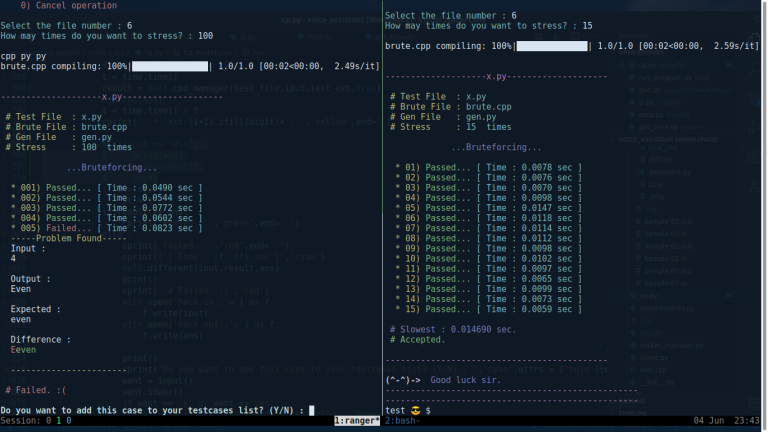
It will ask for the number of times you want to generate random test cases and test solutions (Stress).
It will match output with the brute-force solution's output. If it failed, it will show the differences and ask you to add this to your test case so that you can test this later. Otherwise, it will show Accepted :smile: .
Generate testcase generator automatically
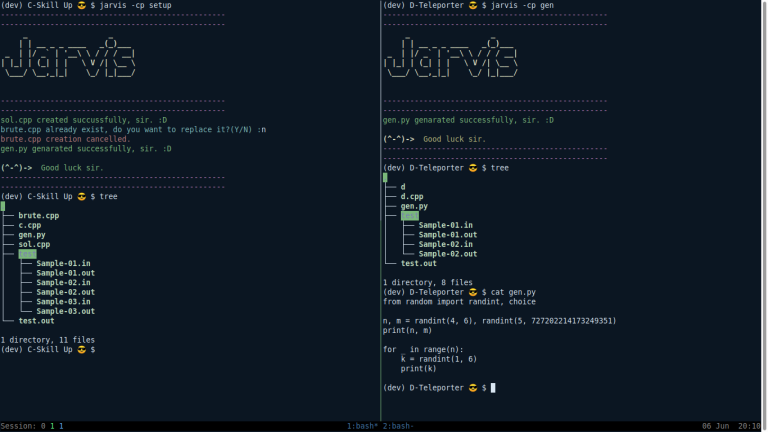
Test case generator can be generated using the given command,
jarvis -cp gen
or
Cp gen
It will analyze all the sample cases and generate gen.py(Test case generator) automatically. Yes, sometimes it might fail (In case of complex test cases). In this case, you have to write a generator manually (You can write in python or c++).
There is also one command, to generate gen.py, brute.cpp(empty file) and sol.cpp(with your template). The command is given below,
jarvis -cp setup
or
Cp setup
Login and submit to online Judge
For login write the given command,
jarvis -cp login
or
Cp login
It will ask for a judge link, your username, and a password.
For submitting code just write the given command,
jarvis -cp submit
or
Cp submit
N.B.: I have used online-judge-api-client for login and submitting codes.
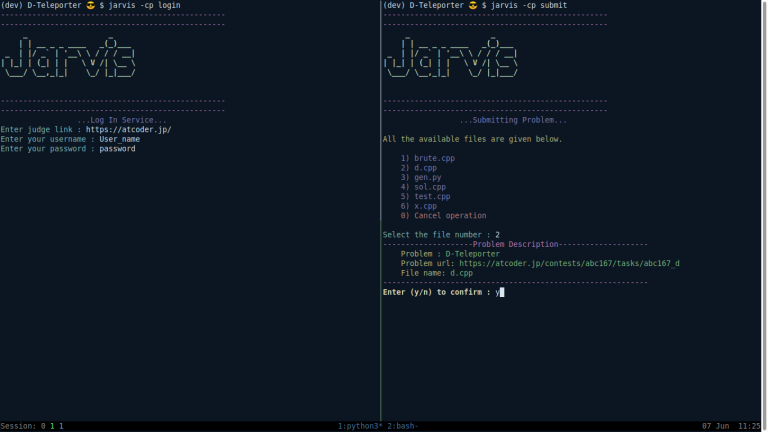
Parsing contest
Parsing contest is the same as parsing problems using the competitive companion. Just write command,
jarvis -cp parse
or
Cp parse
then it will start listening, then just open the contest link and click the browser extension, it will parse all the problems and create a folder for each contest with their test cases.
Also, the contest can be parsed without competitive companion though I don't recommend this. the command is given below,
jarvis -cp contest
or
Cp contest
It will ask for the contest link. Then it will parse all the problems.
goto website
To be honest this is one of my favorite features. You can ask Jarvis to go to any websites as with wish. It will open that in your browser.
The command is given below,
Jarvis goto "website name"
It will open codeforces contest page for you. Basically, you can ask him to go to any website you want.
It is okay to make some typing mistakes while writing a website name. It will still find it out.
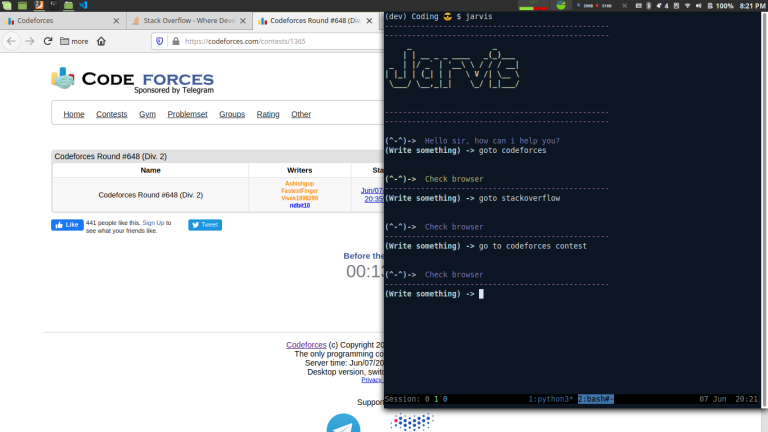
For knowing, all the details about other features please visit : https://github.com/Saurav-Paul/AI-virtual-assistant-python
Config
If you want to change settings, write the given command,
jarvis -config
Competitive companion
Competitive companion is a browser extension that helps to parse problems from various online judges in just one click.
For setting the competitive companion, you have to install the extension to your browser. Just search google, you will find the extension.
After installing, right-click on the extension and click manage extension. Then go to 'Preference' and write custom port 8080. Because the default port number in my project is 8080. If you want to change the port, you can change from the config.
To open config write the following command,
jarvis -config
Installation
Pre-requirements :
- Python-3.5+
- Pip3
For installing write the given commands,
pip3 install wheel
and
pip3 install ai-virtual-assistant
I recommand after installing checkout the config file. The config can be open by the given command,
jarvis -config
N.B : It works fine on Linux. It also should work on Mac os. Unfortunately, it has some problems with windows. If you want to install on windows, you have to install it via WSL(Windows Subsystem for Linux).
If you want to contribute on this project you are mostly welcome and I will be really very happy.
Conclusion:
I am writing a blog in codeforces for the first time. Please pardon me, if I made any mistakes. Actually, I have made this assistant for my self. And then I thought I should share it with this awesome community, it might help other members.
And please if you face any bugs please report me, I will fix it. I think this project has a lot of scope to imporve, if you suggest me or contribute on this project we can make it better.
If you like it please leave a star on github, Thank you for reading this blog. Happy coding.
Github project link : https://github.com/Saurav-Paul/AI-virtual-assistant-python
Pypi link : https://pypi.org/project/ai-virtual-assistant/


Saurav_Paul congratulations bro.
Thank you brother. I hope it will help you.
During the few days of testing with wsl,i found it pretty useful for CP. Some features like adding own testcases,generating random testcases and matching them with brute force solution etc. made it really unique and advanced. Even in windows,it worked without any notable problem with wsl+vs code combination. So i'd say,great job.
Thanks man... You have really helped me by testing it many times. And i am really happy that it is helping you.
Intriguing !!!
I hope that it will help you .. :)
congratulations Saurav_Paul
Hey, Thank you. ^-^
So, you are Ironman XD
I can't wait to install and use it, looks quite impressive
Happy to hear that. I hope it will help you.
good to see bndhu @saurav
Thanks man. :D