I have done most of my CF contests using a 2015 MacBook Pro, and my experience, for the most part, was not as enjoyable as when I did contests using my Windows PC. I saw that my Mac compiled using C++98, even though my gcc compiler was up to date, so I could not use stuff like range-based loop, auto, etc in my code. I got used to it, but recently I started looking for a fix again, and luckily I was able to finally do it. Here are the steps, in case I have to do this again in the future.
Installing GCC
Mac's default C++ compiler Clang does not include many of the libraries provided by GCC, which is regularly used by competitive programmers, like #include <bits/stdc++.h> and Policy Based Data Structures. So you're missing out by not using GCC.
Make sure the terminal is at the root folder by typing cd ~. First set up homebrew in your mac and install gcc by typing brew install gcc in the terminal. To find more details about this step check the links provided at the end.
Using GCC to the fullest
GCC already supports up to the latest C++ version but is defaulted to older ones for some reason. To remedy this you first need to know the version of gcc you are using.
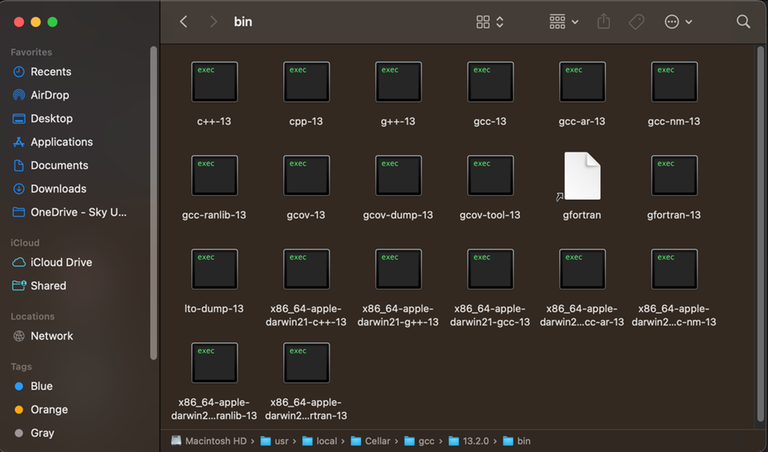
Open Finder and click Go > Go to Folder on the top menu bar.
Type /usr/local/Cellar/gcc in the search box and press Return to open.
Then go to (whatever version number is here) -> bin. Here in the
binfolder, you can see the gcc and g++ versions.
Now that you know the version of your g++ compiler, the next time you compile a C++ code instead of using just g++ use g++-13 instead (I used 13 since that is my g++ compiler version).
Congratulations you can now use everything from #include <bits/stdc++.h> to Policy Based Data Structures. However, for some reason, this still compiles using C++17, which is fine, but if you want to use C++20 (which is the latest version as of writing this) just add -std=c++20 after g++-13.
So from now on, instead of executing your code using g++ <filename>.cpp, use g++-13 -std=c++20 <filename>.cpp.
Configuring VS Code
If you use VS code instead of compiling through the terminal like me, you can easily implement this. If you are using code runner for execution do the following:
Go to
Code>Preferences>Settings, then in the search bar at the top of settings typecode-runner.executormap.Select
Edit in settings.json, A JSON file will open.From this settings.json file change the line with the key
cpp. This is basically what VS code uses to compile your C++ code and show it to you. So replace theg++here withg++-13and add-std=c++20after this.
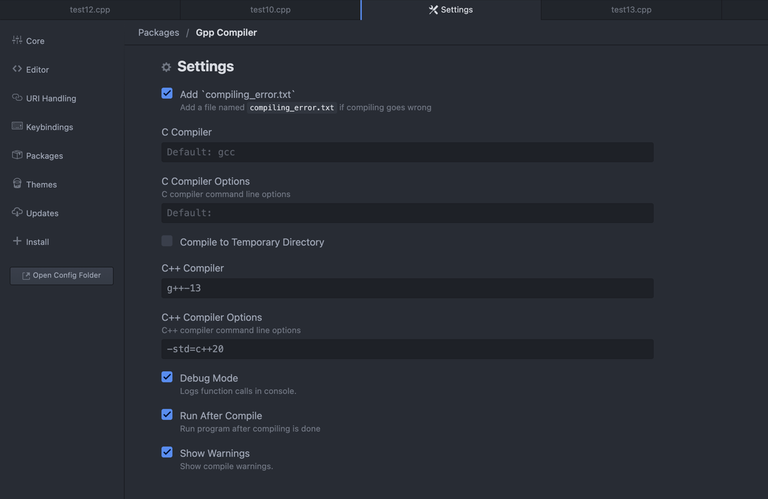
Personally, I use the Atom IDE, cuz I just got used to it over the years, and I got it to work there too by changing the setting of the Gpp compiler. For any similar type of IDE, I believe doing the same as me would also work.
References
https://stackoverflow.com/questions/39091173/how-to-enable-c17-on-mac


error squiggles dont go away in vs code but the code works when auto keyword is used
Your IntelliSense doesn't know if you're using C++20, hence the error squiggles.
Try adding
"C_Cpp.default.cppStandard": "c++20"in yoursettings.jsonWorks in windows, most probably will work in MacOS too.
this works fine with macos
https://code.visualstudio.com/docs/cpp/configure-intellisense
For Apple Silicon chips (M1/M2), for finding gcc version number, instead of
/usr/local/Cellar/gccsearch for/opt/homebrew/Cellar/gcc/this line really saves me
you saved us
Any suggestions for Xcode?